
Many coating problems that look like product faults turn out to be environmental. Dust settling in wet coating, a print dried next to a busy doorway, or a damp corner that slows drying can all spoil an otherwise good job. A dedicated finishing area, even a modest one, removes a lot of that variation.
Location
Choose a space away from cutting, sanding and packing, all of which create dust and fibres. It should not be a through route for people or trolleys. If you share a unit with other activities, a partitioned area or curtained bay is better than an open corner. Think about where vapour will go: solvent coatings need good ventilation, and the area should be well away from ignition sources such as heaters, open flames and electrical equipment that is not suited to the environment.
The essentials
A flat, cleanable work surface
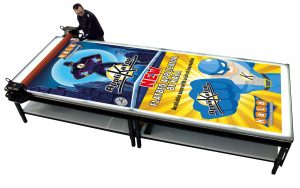
Your coating or laminating table should be larger than the biggest print you routinely handle, level, and finished in a material you can wipe down. A flatbed laminator such as the Kala Applikator offers a modular table that can be extended and under-table storage, which helps keep consumables close but out of the way.
Drying space
Plan drying space as carefully as working space. Racks or flat shelves that hold prints horizontally and apart from each other let you keep coating while earlier pieces dry. Drying racks should be in the same clean, ventilated zone, not in a stockroom.
Good lighting
Bright, even light, ideally with the option to view the surface at a low angle, makes it far easier to spot missed areas, dust and uneven sheen before a print leaves the room.
Safe storage
Store coatings and solvents as the safety data sheet describes, in closed containers and in suitable storage. Our guide to storing coatings covers this in more depth.
Setting it up
- Carry out a risk assessment for the coatings and processes you will use, based on their SDS.
- Arrange ventilation suited to that assessment before anything else is installed.
- Lay out the flow: prints arrive, are inspected and dusted, coated, moved to drying, then inspected and packed elsewhere.
- Install the work table, drying racks and lighting along that route so wet prints never cross a dusty area.
- Provide a place for PPE, spill materials and a lidded metal bin for solvent-soaked rags.
- Agree a cleaning routine, such as wiping surfaces and damp-mopping floors at the end of each day, rather than sweeping.
Keeping it clean
Dust is the enemy you will fight most often. Keep cardboard, which sheds fibres, out of the finishing area. Wear clothing that does not shed lint. Dust prints with a soft brush or lint-free cloth immediately before coating, not ten minutes earlier. If dust still appears in the finish, look at air movement: fans or open doors can carry particles straight onto wet prints. Our coating safety guide has more on balancing ventilation with a clean environment.
If you would like advice on equipment for a new finishing area, speak to Landor on 01252 624 411 or write to us via the contact page.